chipKIT® Development Platform
Inspired by Arduino™
- Get Started
- Learning
- Products
- Blog
- Beginner
For first time users of chipKIT modules. - Intermediate
For users who have a moderate exposure with chipKIT modules. - Advanced
For users who are experts with chipKIT modules. - Developers
- About Us
- Support
Serial Communication - I2C EEPROM using MPLAB X IDE
Posted 2017-02-13 09:58:12 by MajenkoOverview:
In this project you will learn to use a basic functionality of chipKIT board, which is to use serial communication I2C bus to read and write values from EEPROM memory. I2C bus is a master slave bus, which communicates data from the processor on chipKIT board to other peripherals. More description on I2C communication can be found on the Wikipedia website and on EEPROM can be found here. The configuration is done though MPLAB X IDE.
Hardware Used:
To do the serial communication project, you require the following hardware devices.
- chipKIT Uno 32
- chipKIT Basic IO shield
- PICkit® 3 In-Circuit Debugger/Programmer
- USB cable
- 6 pin header to connect chipKIT board and PICkit® 3
Reference:
The reference guide for each board, schematics and other resources are available on their individual homepages:
- chipKIT Uno32 homepage at: http://www.digilentinc.com/Products/Detail.cfm?NavPath=2,892,893&Prod=CHIPKIT-UNO32
- chipKIT Basic I/O Shield homepage: http://www.digilentinc.com/Products/Detail.cfm?NavPath=2,892,936&Prod=CHIPKIT-BASIC-IO-SHIELD
Procedure:
-
Connect the hardware devices. The PICkit® 3 should be connected to the chipKIT Uno32 board through a suitable header and use the USB cable to connect the PICkit® 3 to your PC.
-
Make sure that the jumper settings for JP4 on chipKIT Uno32 board is configured as SPI Slave Select input mode. You can find the jumper settings in chipKIT Uno32 board reference manual from the Digilent website. Also, ensure that the jumpers JP6/JP8 are configured to be used as I2C communication lines.
-
Place the IO shield on top of the Uno32 board with a bit of a firm press.
-
Once the hardware setup is made and the device drivers are updated for PICkit® 3 on your computer, launch MPLAB X (Start>All Programs>Microchip>MPLAB X IDE>MPLAB X IDE vx.xx on Windows® Machines).
-
Create a new project through File>New Project. In the pop up new project window, select *Standalone Project * under Projects and click Next. Under Family scroll and select 32-bit MCUs (PIC32). Note the processor number from the chipKIT board's reference manual and enter it under the Device option. Click Next.
-
Select PICkit3 in the Hardware Tools, click Next. Select XC32 (v1.20) under Compiler Toolchains, click Next. Give a project name to create the project.
-
In the Project tab on the left side of the MPLAB X IDE, right click on Source Files > New > C Main File.. and give a file name for main source code. Once the dot c file opens, select all the codes in the file and replace it with the codes below.
#include

#pragma config FPLLMUL = MUL_20, FPLLIDIV = DIV_2, FPLLODIV = DIV_1, FWDTEN = OFF
#pragma config POSCMOD = HS, FNOSC = PRIPLL, FPBDIV = DIV_1
#define SYS_FREQ (80000000L)

#define GetSystemClock()           (SYS_FREQ)
#define GetPeripheralClock()       (SYS_FREQ/1)
#define GetInstructionClock()      (SYS_FREQ)
#define I2C_CLOCK_FREQ             5000

// EEPROM Constants
#define EEPROM_I2C_BUS              I2C1
#define EEPROM_ADDRESS              0x50        // 0b1010000 Serial EEPROM address

/*******************************************************************************
  Function:
    BOOL StartTransfer( BOOL restart )

  Summary:
    Starts (or restarts) a transfer to/from the EEPROM.

  Description:
    This routine starts (or restarts) a transfer to/from the EEPROM, waiting (in
    a blocking loop) until the start (or re-start) condition has completed.

  Precondition:
    The I2C module must have been initialized.

  Parameters:
    restart - If FALSE, send a "Start" condition
            - If TRUE, send a "Restart" condition

  Returns:
    TRUE    - If successful
    FALSE   - If a collision occured during Start signaling

  Example:

    StartTransfer(FALSE);


  Remarks:
    This is a blocking routine that waits for the bus to be idle and the Start
    (or Restart) signal to complete.
  *****************************************************************************/

BOOL StartTransfer( BOOL restart )
{
    I2C_STATUS  status;

    // Send the Start (or Restart) signal
    if(restart)
    {
        I2CRepeatStart(EEPROM_I2C_BUS);
    }
    else
    {
        // Wait for the bus to be idle, then start the transfer
        while( !I2CBusIsIdle(EEPROM_I2C_BUS) );

        if(I2CStart(EEPROM_I2C_BUS) != I2C_SUCCESS)
        {
            DBPRINTF("Error: Bus collision during transfer Start\n");
            return FALSE;
        }
    }

    // Wait for the signal to complete
    do
    {
        status = I2CGetStatus(EEPROM_I2C_BUS);

    } while ( !(status & I2C_START) );

    return TRUE;
}

/*******************************************************************************
  Function:
    BOOL TransmitOneByte( UINT8 data )

  Summary:
    This transmits one byte to the EEPROM.

  Description:
    This transmits one byte to the EEPROM, and reports errors for any bus
    collisions.

  Precondition:
    The transfer must have been previously started.

  Parameters:
    data    - Data byte to transmit

  Returns:
    TRUE    - Data was sent successfully
    FALSE   - A bus collision occured

  Example:

    TransmitOneByte(0xAA);


  Remarks:
    This is a blocking routine that waits for the transmission to complete.
  *****************************************************************************/

BOOL TransmitOneByte( UINT8 data )
{
    // Wait for the transmitter to be ready
    while(!I2CTransmitterIsReady(EEPROM_I2C_BUS));

    // Transmit the byte
    if(I2CSendByte(EEPROM_I2C_BUS, data) == I2C_MASTER_BUS_COLLISION)
    {
        DBPRINTF("Error: I2C Master Bus Collision\n");
        return FALSE;
    }

    // Wait for the transmission to finish
    while(!I2CTransmissionHasCompleted(EEPROM_I2C_BUS));

    return TRUE;
}

/*******************************************************************************
  Function:
    void StopTransfer( void )

  Summary:
    Stops a transfer to/from the EEPROM.

  Description:
    This routine Stops a transfer to/from the EEPROM, waiting (in a
    blocking loop) until the Stop condition has completed.

  Precondition:
    The I2C module must have been initialized & a transfer started.

  Parameters:
    None.

  Returns:
    None.

  Example:

    StopTransfer();


  Remarks:
    This is a blocking routine that waits for the Stop signal to complete.
  *****************************************************************************/

void StopTransfer( void )
{
    I2C_STATUS  status;

    // Send the Stop signal
    I2CStop(EEPROM_I2C_BUS);

    // Wait for the signal to complete
    do
    {
        status = I2CGetStatus(EEPROM_I2C_BUS);

    } while ( !(status & I2C_STOP) );
}

// ****************************************************************************
// ****************************************************************************
// Application Main Entry Point
// ****************************************************************************
// ****************************************************************************

int main(void)
{
    UINT8               i2cData[10];
    I2C_7_BIT_ADDRESS   SlaveAddress;
    int                 Index;
    int                 DataSz;
    UINT32              actualClock;
    BOOL                Acknowledged;
    BOOL                Success = TRUE;
    UINT8               i2cbyte;

    // Initialize debug messages (when supported)
    DBINIT();

    // Set the I2C baudrate
    actualClock = I2CSetFrequency(EEPROM_I2C_BUS, GetPeripheralClock(), I2C_CLOCK_FREQ);
    if ( abs(actualClock-I2C_CLOCK_FREQ) > I2C_CLOCK_FREQ/10 )
    {
        DBPRINTF("Error: I2C1 clock frequency (%u) error exceeds 10%%.\n", (unsigned)actualClock);
    }

    // Enable the I2C bus
    I2CEnable(EEPROM_I2C_BUS, TRUE);

    //
    // Send the data to EEPROM to program one location
    //

    // Initialize the data buffer
    I2C_FORMAT_7_BIT_ADDRESS(SlaveAddress, EEPROM_ADDRESS, I2C_WRITE);
    i2cData[0] = SlaveAddress.byte;
    i2cData[1] = 0x05;              // EEPROM location to program (high address byte)
    i2cData[2] = 0x40;              // EEPROM location to program (low address byte)
    i2cData[3] = 0xAA;              // Data to write
    DataSz = 4;

    // Start the transfer to write data to the EEPROM
    if( !StartTransfer(FALSE) )
    {
        while(1);
    }

    // Transmit all data
    Index = 0;
    while( Success && (Index < DataSz) )
    {
        // Transmit a byte
        if (TransmitOneByte(i2cData[Index]))
        {
            // Advance to the next byte
            Index++;

            // Verify that the byte was acknowledged
            if(!I2CByteWasAcknowledged(EEPROM_I2C_BUS))
            {
                DBPRINTF("Error: Sent byte was not acknowledged\n");
                Success = FALSE;
            }
        }
        else
        {
            Success = FALSE;
        }
    }

    // End the transfer (hang here if an error occured)
    StopTransfer();
    if(!Success)
    {
        while(1);
    }

    // Wait for EEPROM to complete write process, by polling the ack status.
    Acknowledged = FALSE;
    do
    {
        // Start the transfer to address the EEPROM
        if( !StartTransfer(FALSE) )
        {
            while(1);
        }

        // Transmit just the EEPROM's address
        if (TransmitOneByte(SlaveAddress.byte))
        {
            // Check to see if the byte was acknowledged
            Acknowledged = I2CByteWasAcknowledged(EEPROM_I2C_BUS);
        }
        else
        {
            Success = FALSE;
        }

        // End the transfer (stop here if an error occured)
        StopTransfer();
        if(!Success)
        {
            while(1);
        }

    } while (Acknowledged != TRUE);

    //
    // Read the data back from the EEPROM.
    //

    // Initialize the data buffer
    I2C_FORMAT_7_BIT_ADDRESS(SlaveAddress, EEPROM_ADDRESS, I2C_WRITE);
    i2cData[0] = SlaveAddress.byte;
    i2cData[1] = 0x05;              // EEPROM location to read (high address byte)
    i2cData[2] = 0x40;              // EEPROM location to read (low address byte)
    DataSz = 3;

    // Start the transfer to read the EEPROM.
    if( !StartTransfer(FALSE) )
    {
        while(1);
    }

    // Address the EEPROM.
    Index = 0;
    while( Success & (Index < DataSz) )
    {
        // Transmit a byte
        if (TransmitOneByte(i2cData[Index]))
        {
            // Advance to the next byte
            Index++;
        }
        else
        {
            Success = FALSE;
        }

        // Verify that the byte was acknowledged
        if(!I2CByteWasAcknowledged(EEPROM_I2C_BUS))
        {
            DBPRINTF("Error: Sent byte was not acknowledged\n");
            Success = FALSE;
        }
    }

    // Restart and send the EEPROM's internal address to switch to a read transfer
    if(Success)
    {
        // Send a Repeated Started condition
        if( !StartTransfer(TRUE) )
        {
            while(1);
        }

        // Transmit the address with the READ bit set
        I2C_FORMAT_7_BIT_ADDRESS(SlaveAddress, EEPROM_ADDRESS, I2C_READ);
        if (TransmitOneByte(SlaveAddress.byte))
        {
            // Verify that the byte was acknowledged
            if(!I2CByteWasAcknowledged(EEPROM_I2C_BUS))
            {
                DBPRINTF("Error: Sent byte was not acknowledged\n");
                Success = FALSE;
            }
        }
        else
        {
            Success = FALSE;
        }
    }

    // Read the data from the desired address
    if(Success)
    {
        if(I2CReceiverEnable(EEPROM_I2C_BUS, TRUE) == I2C_RECEIVE_OVERFLOW)
        {
            DBPRINTF("Error: I2C Receive Overflow\n");
            Success = FALSE;
        }
        else
        {
            while(!I2CReceivedDataIsAvailable(EEPROM_I2C_BUS));
            i2cbyte = I2CGetByte(EEPROM_I2C_BUS);
        }

    }

    // End the transfer (stop here if an error occured)
    StopTransfer();
    if(!Success)
    {
        while(1);
    }

    // Validate the data read
    if( i2cbyte != 0xAA )
    {
        DBPRINTF("Error: Verify failed\n");
    }
    else
    {
        DBPRINTF("Success\n");
    }

    // Example complete
    while(1);
}
-
In the above program, the EEPROM is being written with a value AA and read from the memory to verify if it written correctly. To verify the result access the watch window from Window > Debugging > Watches or you can use the shortcut key Alt+Shift+2. In the watch window panel that opens on the MPLAB X IDE, enter the new watch as i2cbyte, in the blank
<Enter new watch>area. -
In the program editor window, put a breakpoint by clicking on the line number on the while statement near the end of the program.
-
Click on Debug Project icon shown below,
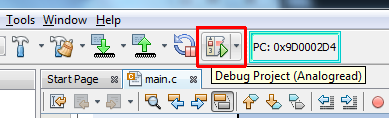
-
Once the program halts its execution at the line with the breakpoint, click on Watches window below the code area. You can observe the output value being reflected in the i2cbyte variable as shown below.
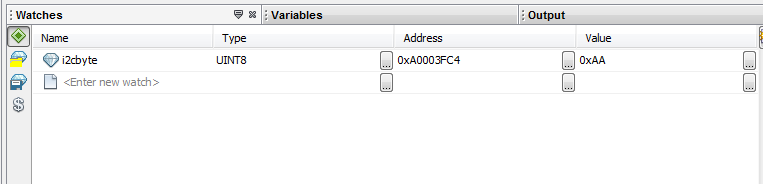
This verifies the operation of writing into and reading from EEPROM memory through the I2C serial communication. To get more information on working of I2C serial communication visit the wikipedia website by clicking here. In our application EEPROM on the IOshield is the slave device and PIC controller on chipKIT Uno32 board acts as the master device.