chipKIT® Development Platform
Inspired by Arduino™
- Get Started
- Learning
- Products
- Blog
- Beginner
For first time users of chipKIT modules. - Intermediate
For users who have a moderate exposure with chipKIT modules. - Advanced
For users who are experts with chipKIT modules. - Developers
- About Us
- Support
Arduino-style Maze Solving Robot using Sparkfun Ardumoto
Posted 2017-02-13 09:47:18 by MajenkoOVERVIEW:
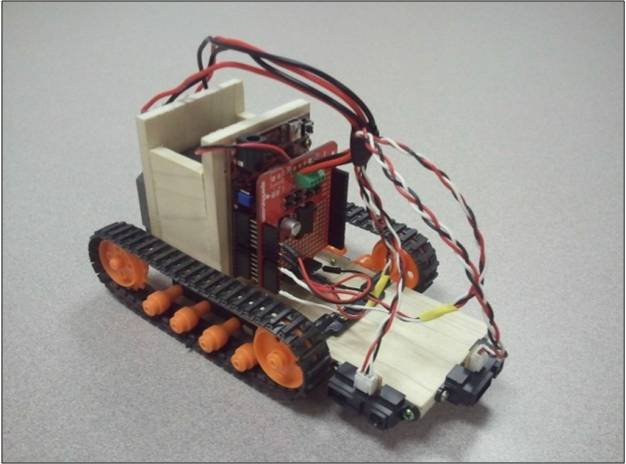
Here is a robot application that implements a very simple maze solving algorithm. This application uses off the shelf components along with a very basic chassis built from common materials. This could be a good weekend project. The robot chassis for this Demo was constructed with 2½" wide by ¼" thick poplar project wood purchased at a local home improvement center. Note that a box was also created to house the battery holder.
HARDWARE USED
- Sparkfun Ardumoto (Item #: DEV-09815): https://www.sparkfun.com/products/9815
- chipKIT Uno32 Development Board: http://www.digilentinc.com/Products/Detail.cfm?NavPath=2,892,893&Prod=CHIPKIT-UNO32
- Tamiya 70100 Track and Wheel Set: http://www.tamiyausa.com/product/item.php?product-id=70100
- Tamiya 70168 Double Gearbox: https://www.tamiyausa.com/product/item.php?product-id=70168
- Sharp IR Distance Sensors (GP2Y0A21YK0F): These are available from a number of distributors including:
- 6 x AA Batteries and Holder
CONSTRUCTION
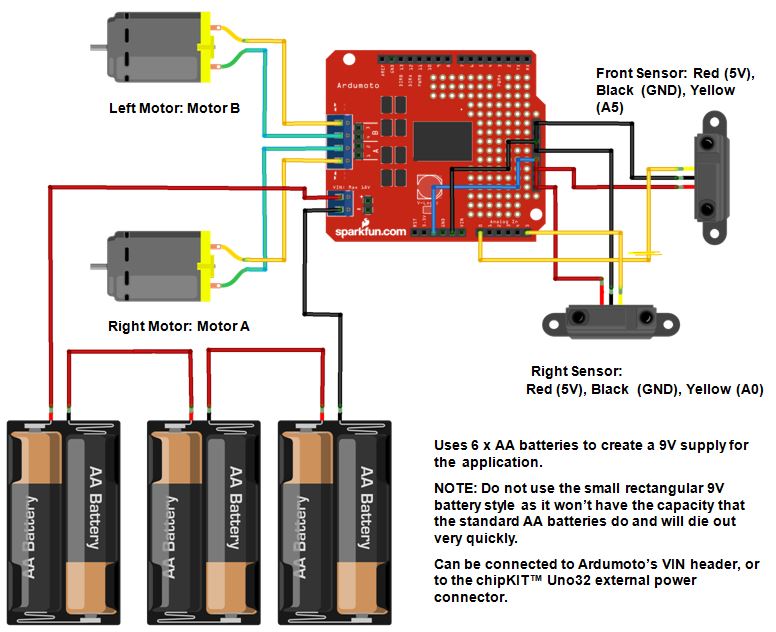
The Ardumoto Shield is mounted to a chipKIT Uno32 Development Platform with all component connections made to the shield as indicated in labels next to component.
LOGIC OVERVIEW
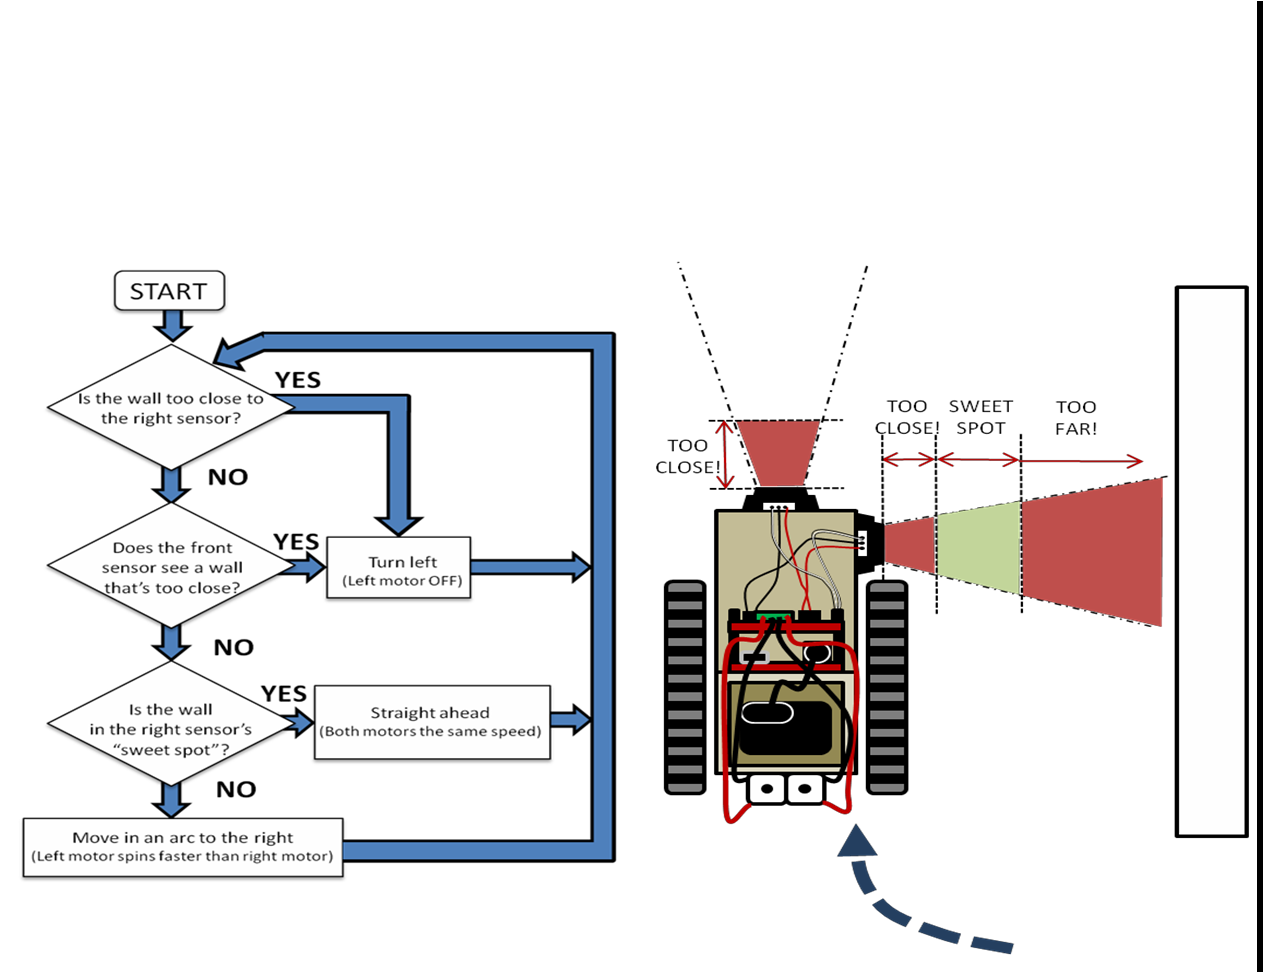
The maze solving theory used here is based on the following: Say you enter a maze or room, close your eyes, place your right hand on the wall, and start walking while keeping your hand on the wall. You will eventually find your way out of the room or maze. Not the fastest route, but it works! This assumes that all the walls are connected of course. Here is the basic software algorithm in flowchart form. A graphical representation of the robot and the sensors is on the right of the chart for reference. Robot starts by checking its sensors. If it detects a wall on its side sensor, it checks to see if the wall is in its "Sweet Spot". If so, the robot will adjust its wheel speeds to move in a straight line (supposedly parallel to the wall). If either the front or side sensor detects a wall that is too close, then the robot turns off its left wheel so that it veers to the left (hopefully avoiding a collision). Otherwise, the robot will move in a wide circle to the right with the hopes that an object will come into view of at least one of the sensors. Note: You can also use the left side to do this.
SKETCH
/*
 9/10/2012
 Marc McComb

This code runs a maze solving routine based on the following:
Say you enter a maze or room, close your eyes, place your right hand on the wall, and start walking while keeping your hand on the wall.
You will eventually find your way out of the room or maze. Not the fastest route, but it works! This assumes that all the walls are connected of course.

So the robot starts by checking its sensors. If it detects a wall on its side sensor, it checks to see if the wall is in its "Sweet Spot". If so, the robot
will adjust its wheel speeds to move in a straight line (supposedly parallel to the wall). If either the front or side sensor detects a wall that is too close,
then the robot turns off its left wheel so that it veers to the left (hopefully avoiding a collision). Otherwise, the robot will move in a wide circle to the
right with the hopes that an object will come into view of at least one of the sensors.

This application uses the following hardware:
chipKIT™ Uno32 available at http://www.digilentinc.com/chipkit
Sparkfun Ardumoto - Motor Driver shield: https://www.sparkfun.com/products/9815
Some Sharp GP2Y0A21YK0F IR Sensors - Available at Adafruit with wires already attached: https://www.adafruit.com/products/164

Software used:
The Ardumoto board is designed for a PWM on pin 11. Since the Uno32 doesn't have a hardware PWM on that pin, no worries, we just
use Brian Schmaltzs SoftPWMServo library:
http://www.chipkit.org/wiki/index.php?title=Library_Status#SoftPWMServo_library

You will need to make sure that you add the library. To do this:
1) Make sure that you have a folder in your Documents:/MPIDE folder called Libraries
2) Copy the SoftPWMServo library folder from C:\mpide-0023-windows-20120903\hardware\pic32\libraries to the Libraries folder above
3) If MPIDE is open, close and reopen.
4) Now all you have to do is go to the MPIDE toolbar and select Sketch>Import Library>SoftPWMServo

More info on libraries at:
http://arduino.cc/en/Reference/Libraries

*/

//Need to use this library instead of just analogWrite() since there pin 11 isn't a PWM pin on the chipKIT UNO32 board.
//No big deal. This library works great on almost any pin.
#include <SoftPWMServo.h>

//MOTOR SETUP
const int pwm_a = 3;   //PWM control for motor outputs 1 and 2 is on digital pin 3
const int pwm_b = 11;  //PWM control for motor outputs 3 and 4 is on digital pin 11
const int dir_a = 12;  //direction control for motor outputs 1 and 2 is on digital pin 12
const int dir_b = 13;  //direction control for motor outputs 3 and 4 is on digital pin 13
const char motor_speed = 200; //set the motor speed (between 0 and 255)

//IR SENSOR SETUP
const int rSensor_pin = 0; //right sensor will be read on ANO
const int fSensor_pin = 5; //front sensor will be read on AN5

//Let's set up some variable that we'll use in the code
int rSensor_val = 0;  //this will be the right sensor value ADC reading (between 0 and 1023)
int fSensor_val = 0;  //this will be the front sensor value ADC reading (between 0 and 1023)
boolean sweetspot = false;  //boolean value initialized to false. When its true, it means the wall on the right of the robot is the "sweet spot"
boolean rSensorHit = false; //boolean value initialized to false. When its true, it means the wall on the robot's right is too close
boolean fSensorHit = false; //boolean value initialized to false. When its true, it means the wall in front of the robot is too close
int sensor_state = 0;

void setup()
{
  pinMode(dir_a, OUTPUT); //Set the dir_a pin as an output
  pinMode(dir_b, OUTPUT); //Set dir_b pin as an output
  digitalWrite(dir_a,  HIGH);  //Reverse motor direction, 1 high, 2 low
  digitalWrite(dir_b, HIGH);  //Reverse motor direction, 3 low, 4 high

}

void loop()
{

  //This is how I usually do things but you may wish to change it up a bit

  //First get all you inputs
  read_sensors();
  //Then make some decisions based on these inputs
  parse_inputs();
  //Then do all your outputs at the same time. In this case, determine motor speeds
  run_motors();
  //I always have a loop timing function
  loop_timing();
}

//this function reads the IR value on the analog input pins
void read_sensors()
{

  rSensor_val = analogRead(rSensor_pin);
  fSensor_val = analogRead(fSensor_pin);
}

//this function then makes decisions based on those inputs
void parse_inputs()
{

  if (fSensor_val > 850) fSensorHit = true; //if the front sensor sees a wall set the fSensorHit variable TRUE

  //Otherwise, check if the robot is in the "sweet spot"
  else if ((rSensor_val > 750)&&(rSensor_val <850)&&(fSensor_val < 850)) sweetspot = true;      //If not, then is the wall on the right side of the robot too close?   //If so, set the rSensorHit variable TRUE   else if (rSensor_val > 850) rSensorHit = true;

  //Otherwise make sure all of the sensor flags are set to FALSE
  else{
    fSensorHit = false;
    rSensorHit = false;
    sweetspot = false;
  }

  //reinitialize your sensor variable to a known state
  rSensor_val = 0;
  fSensor_val = 0;

}

//This routine runs the two motors based on the flags in the previous funciton
void run_motors()
{

  //If the wall on the right is too close, turn left away from the wall
  if (rSensorHit)left();

  //Otherwise, if the wall is in the "sweet spot", then try and stay parallel with the wall
  //keeping both wheel speeds the same
  else if (sweetspot)forward();

  //If the front sensor sees a wall, turn left
  else if (fSensorHit)left();

  //If neither sensor sees a wall, then move in a really big arc to the right.
  //Hopefully, the bot wil be able to pick up a wall
  else right();

  //Always set your flags to a know value. In this case, FALSE
    fSensorHit = false;
    rSensorHit = false;
    sweetspot = false;

}

void loop_timing()
{
  delay(50);

}

//Motor routines called by the run_motors()

void forward() //full speed forward
{

  //both wheels spin at the same speed
  SoftPWMServoPWMWrite(pwm_a, motor_speed);
  SoftPWMServoPWMWrite(pwm_b, motor_speed);
}

void stopped() //stop
{

  //turn off both motors
  SoftPWMServoPWMWrite(pwm_a, 0);
  SoftPWMServoPWMWrite(pwm_b, 0);
}

void left()                   //stop motor A
{

  //turn of the left motor so that the robot vears to the left
  SoftPWMServoPWMWrite(pwm_a, motor_speed);
  SoftPWMServoPWMWrite(pwm_b, 0);

}

void right()                   //stop motor B
{

  //Here we're running the right motor at a slower speed than the left motor
  //Therefore, the bot will travel in a large circle to the right
  SoftPWMServoPWMWrite(pwm_a, 50);
  SoftPWMServoPWMWrite(pwm_b, motor_speed+50);
}